The Wall: Difference between revisions
m Text replacement - "|image = File:North " to "|image = North " |
Tearphones (talk | contribs) puzzle elements, summary and hints |
||
| (One intermediate revision by one other user not shown) | |||
| Line 1: | Line 1: | ||
{{Infobox TTP2 Puzzle | {{Infobox TTP2 Puzzle | ||
|identifier = North 3-3 | |identifier = North 3-3 | ||
| Line 10: | Line 9: | ||
'''The Wall''' is the third main puzzle in the Lost Marshes area of The Talos Principle 2. | '''The Wall''' is the third main puzzle in the Lost Marshes area of The Talos Principle 2. | ||
== Puzzle | == Puzzle elements == | ||
{{Puzzle Element List}} | {{Puzzle Element List|Blue door=true|Connector=true|Driller=true|Hexahedron=true|Jammer=true|Purple barrier=true|Receiver=true|Swapper=true}} | ||
==Overview== | ==Overview== | ||
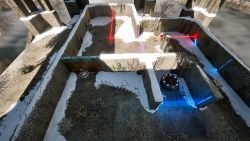
When you enter the puzzle, you find yourself in an L-shaped room. There is a [[swapper]] to the left with a [[driller]] in it, with a drillable wall immediately in front of it. There is a small room with the [[progress wheel]] in it, blocked off with a [[blue door]]. On the right, there is a [[hexahedron]] next to a blue door that is currently open. Through that door is the second room with a red [[receiver]]. That room leads to a third room via a [[purple barrier]]. There is a [[connector]] that is currently transmitting [[laser]] from a red [[emitter]] to the red receiver in the second room. There is a swapper further inside the room with a [[jammer]] in it. | |||
==Hints== | |||
{{ProgressiveHint|A basic hint|Since the name of this puzzle is ''The Wall'', you have to think about the boundary between two rooms, the wall, and how to use it effectively.}} | |||
{{ProgressiveHint|If you're struggling to get started|The only truly useless piece of equipment in this puzzle is the hexahedron. Start with that.}} | |||
{{ProgressiveHint|If you're scared to disconnect the connector|In most puzzles with swappers, you have to evaluate not only ''how'' to use some equipment, but also ''when'' to use it. The connector is only useful when you're moving from room to room. If you're not moving right now, it is not useful, and you can temporarily put it in a swapper.}} | |||
{{ProgressiveHint|If you're not sure what the driller is for|Swappers can be operated through holes made by drillers.}} | |||
{{ProgressiveHint|A list of major objectives|Obtain the driller. Obtain the jammer. Bring the jammer outside.}} | |||
== Solution == | == Solution == | ||
Latest revision as of 23:37, 17 December 2023
| The Wall | |
|---|---|

| |
| Identifier: | North 3-3 |
| Area: | Lost Marshes |
| Puzzle Type: | Main |
| Previous Puzzle: | Possibilities |
| Next Puzzle: | Prison |
The Wall is the third main puzzle in the Lost Marshes area of The Talos Principle 2.
Puzzle elements
Overview
When you enter the puzzle, you find yourself in an L-shaped room. There is a swapper to the left with a driller in it, with a drillable wall immediately in front of it. There is a small room with the progress wheel in it, blocked off with a blue door. On the right, there is a hexahedron next to a blue door that is currently open. Through that door is the second room with a red receiver. That room leads to a third room via a purple barrier. There is a connector that is currently transmitting laser from a red emitter to the red receiver in the second room. There is a swapper further inside the room with a jammer in it.
Hints
A basic hint:
If you're struggling to get started:
If you're scared to disconnect the connector:
If you're not sure what the driller is for:
A list of major objectives:
