Step and Release: Difference between revisions
m Text replacement - "{{Puzzle Element List|RGB converter=true|Connector=true|Hexahedron=true|Fan=true|Receiver=true|Blue door=true}}" to "{{Puzzle Element List}}" |
Tearphones (talk | contribs) puzzle elements, summary and hints |
||
| (3 intermediate revisions by one other user not shown) | |||
| Line 1: | Line 1: | ||
{{ | {{Infobox TTP2 Puzzle | ||
|identifier = South 2-8 | |identifier = South 2-8 | ||
|image = | |image = South 2-8.jpg | ||
|area = [[Verdant Canyon]] | |area = [[Verdant Canyon]] | ||
|puzzletype = [[:Category:TTP2 Main Puzzles|Main]] | |puzzletype = [[:Category:TTP2 Main Puzzles|Main]] | ||
| Line 10: | Line 9: | ||
'''Step and Release''' is the eighth main puzzle in the Verdant Canyon area of The Talos Principle 2. | '''Step and Release''' is the eighth main puzzle in the Verdant Canyon area of The Talos Principle 2. | ||
== Puzzle | == Puzzle elements == | ||
{{Puzzle Element List}} | {{Puzzle Element List|Accumulator=true|Blue door=true|Fan=true|Gravshifter=true|Jammer=true|Pressure plate=true|Receiver=true|Swapper=true}} | ||
==Overview== | ==Overview== | ||
When you enter the puzzle, you find yourself in a large room. On the left, there are two large gravity surfaces, the first leads up to an upside-down [[swapper]] with a [[gravshifter]] in it. After that, there is a partition, then another section of a gravity surface with another upside down swapper with a [[jammer]] in it. There is a detachable [[fan]] angled towards a raised pedestal with the [[progress wheel]] on it. The fan is not active, but there is a red [[receiver]] connected to it. Further in the back, there is a hallway with two [[blue door]]s on the right and a gravity surface on the left side. In between the two blue doors is an [[accumulator]]. There are two [[pressure plate]]s that deactivate the first blue door, and there is a red [[emitter]] behind the second blue door. | |||
==Hints== | |||
{{ProgressiveHint|A basic hint|Since the name of the puzzle is ''Step and Release'', many times in this puzzle you will have to step onto the gravity surfaces to operate some equipment, and then jump off.}} | |||
{{ProgressiveHint|If you're struggling to get started|The fan blades are detachable. Use it to get the gravshifter.}} | |||
{{ProgressiveHint|If you're wondering what to do next|Grab the accumulator.}} | |||
{{ProgressiveHint|If you're often getting stuck on the wrong swapper|In this puzzle, you have to notice that it is possible to reach the first swapper on your own, using the gravity surface. But reaching the second swapper requires the use of the gravshifter.}} | |||
{{ProgressiveHint|If you're struggling to get the right equipment|It often becomes important to switch around the equipment on the two swappers. Suppose you need the item from the second swapper, and you wish to swap the gravshifter for it. It is possible to do so, but you have to execute the following steps: Take some other equipment (which may be critical also) and swap it on the first swapper. Now take that item you just got, and fly up to the second swapper and get the item you wanted. Now you can pick up the gravshifter, walk up to the first swapper, and retrieve the other critical equipment you need.}} | |||
{{ProgressiveHint|If you're unable to grab the accumulator|There is a gravity surface on the left.}} | |||
{{ProgressiveHint|A list of the major objectives|Obtain the gravshifter. Obtain the accumulator. Use the jammer to charge the accumulator. Get back the fan blades.}} | |||
== Solution == | == Solution == | ||
Latest revision as of 12:03, 19 December 2023
| Step and Release | |
|---|---|

| |
| Identifier: | South 2-8 |
| Area: | Verdant Canyon |
| Puzzle Type: | Main |
| Previous Puzzle: | Delivery |
| Next Puzzle: | Question Block |
Step and Release is the eighth main puzzle in the Verdant Canyon area of The Talos Principle 2.
Puzzle elements
Overview
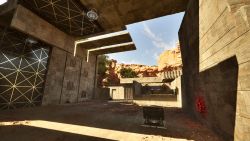
When you enter the puzzle, you find yourself in a large room. On the left, there are two large gravity surfaces, the first leads up to an upside-down swapper with a gravshifter in it. After that, there is a partition, then another section of a gravity surface with another upside down swapper with a jammer in it. There is a detachable fan angled towards a raised pedestal with the progress wheel on it. The fan is not active, but there is a red receiver connected to it. Further in the back, there is a hallway with two blue doors on the right and a gravity surface on the left side. In between the two blue doors is an accumulator. There are two pressure plates that deactivate the first blue door, and there is a red emitter behind the second blue door.
Hints
A basic hint:
If you're struggling to get started:
If you're wondering what to do next:
If you're often getting stuck on the wrong swapper:
If you're struggling to get the right equipment:
If you're unable to grab the accumulator:
A list of the major objectives:
