Remote Interchange: Difference between revisions
m Text replacement - "{{Puzzle Element List|RGB converter=true|Connector=true|Hexahedron=true|Fan=true|Receiver=true|Blue door=true}}" to "{{Puzzle Element List}}" |
Tearphones (talk | contribs) puzzle elements, overview, hints and solution |
||
| (3 intermediate revisions by one other user not shown) | |||
| Line 1: | Line 1: | ||
{{ | {{Infobox TTP2 Puzzle | ||
|identifier = South 1-7 | |identifier = South 1-7 | ||
|image = | |image = South 1-7.jpg | ||
|area = [[Southern Coast]] | |area = [[Southern Coast]] | ||
|puzzletype = [[:Category:TTP2 Main Puzzles|Main]] | |puzzletype = [[:Category:TTP2 Main Puzzles|Main]] | ||
| Line 10: | Line 9: | ||
'''Remote Interchange''' is the seventh main puzzle in the Southern Coast area of The Talos Principle 2. | '''Remote Interchange''' is the seventh main puzzle in the Southern Coast area of The Talos Principle 2. | ||
== Puzzle | == Puzzle elements == | ||
{{Puzzle Element List}} | {{Puzzle Element List|Blue door=true|Connector=true|Hexahedron=true|Jammer=true|Ladder=true|Pressure plate=true|Receiver=true|Swapper=true|Teleporter=true}} | ||
==Overview== | ==Overview== | ||
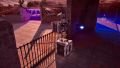
When you enter the puzzle, you find yourself in an open semi-circular area with two [[hexahedron]]s immediately in front of you. There is a half-height grill wall ahead, as well as a [[ladder]] that leads in to the first room. On the left is a [[blue door]] that leads to the [[progress wheel]]. | |||
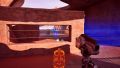
In the first room, you find two [[swapper]]s, each with a [[connector]]. There is a blue [[emitter]] on the back wall and a blue [[receiver]] on the front wall, next to a blue door that leads into the second room. On the left is another [[blue door]] that leads to a third room, beyond which is a fourth room with a window and a [[jammer]] that is currently jamming a blue door. | |||
Inside the second room, there is a [[pressure plate]] that opens the door to the third room. There is also a blue receiver on that side of the wall, and a swapper with a [[teleporter]] in it. | |||
==Hints== | |||
{{ProgressiveHint|A basic hint|Since the name of the puzzle is ''Remote Interchange'', at one point in the puzzle you will have to use a swapper to ''interchange'' something, and then travel to a ''remote'' location.}} | |||
{{ProgressiveHint|If you're stuck outside|Notice that the grill wall is quite low. You can jump over them with hexahedrons, and then pick them up from the other side}} | |||
{{ProgressiveHint|If you're unable to keep the door to the third room open|Note carefully that the game is offering you two connectors, but there's only one door that needs an emitter to stay open. Why two?}} | |||
{{ProgressiveHint|A hint about what a substantial intermediate step should be|In order to make progress in the puzzle, you need the teleporter freely available in the first room, while something is keeping the door to the third room open}} | |||
== Solution == | == Solution == | ||
{{Spoiler| | |||
<gallery mode="slideshow"> | |||
File:S1-7-remote-interchange-solution-01.jpg|Step 1: Place one hexahedron close to the grill wall. Pick up another hex and place it across the wall, then jump over to it. | |||
File:S1-7-remote-interchange-solution-02.jpg|Step 2: Pick up the other hex and bring it into the first room. | |||
File:S1-7-remote-interchange-solution-03.jpg|Step 3: Swap out a hex for a connector. | |||
File:S1-7-remote-interchange-solution-04.jpg|Step 4: Connect the blue receiver to open the blue door to the second room. Swap out another hex for the second connector. | |||
File:S1-7-remote-interchange-solution-05.jpg|Step 5: Connect the blue receiver inside the second room as well. This frees up the connector in the first room. | |||
File:S1-7-remote-interchange-solution-06.jpg|Step 6: Swap out the connector from the first room for the teleporter. Place the teleporter near the grill wall between the first and second rooms. | |||
File:S1-7-remote-interchange-solution-07.jpg|Step 7: Disconnect the receiver, and place the connector on the pressure plate, which opens the door to the third room. Teleport out into the first room. | |||
File:S1-7-remote-interchange-solution-08.jpg|Step 8: Walk into the fourth room, pick up the jammer, and teleport through the window to the first room, bringing the jammer with you. | |||
File:S1-7-remote-interchange-solution-09.jpg|Step 9: Jam the blue door outside from the corner, then take the ladder to finish the puzzle. | |||
</gallery> | |||
|solution}} | |||
[[Category:TTP2 Main Puzzles]] | [[Category:TTP2 Main Puzzles]] | ||
[[Category:TTP2 Puzzles]] | [[Category:TTP2 Puzzles]] | ||
[[Category:Puzzles]] | [[Category:Puzzles]] | ||
[[Category:TTP2]] | [[Category:TTP2]] | ||
Latest revision as of 01:54, 10 December 2023
| Remote Interchange | |
|---|---|

| |
| Identifier: | South 1-7 |
| Area: | Southern Coast |
| Puzzle Type: | Main |
| Previous Puzzle: | Translocator |
| Next Puzzle: | Switcheroo |
Remote Interchange is the seventh main puzzle in the Southern Coast area of The Talos Principle 2.
Puzzle elements
Overview
When you enter the puzzle, you find yourself in an open semi-circular area with two hexahedrons immediately in front of you. There is a half-height grill wall ahead, as well as a ladder that leads in to the first room. On the left is a blue door that leads to the progress wheel.
In the first room, you find two swappers, each with a connector. There is a blue emitter on the back wall and a blue receiver on the front wall, next to a blue door that leads into the second room. On the left is another blue door that leads to a third room, beyond which is a fourth room with a window and a jammer that is currently jamming a blue door.
Inside the second room, there is a pressure plate that opens the door to the third room. There is also a blue receiver on that side of the wall, and a swapper with a teleporter in it.
Hints
A basic hint:
If you're stuck outside:
If you're unable to keep the door to the third room open:
A hint about what a substantial intermediate step should be:
Solution
-
 Step 1: Place one hexahedron close to the grill wall. Pick up another hex and place it across the wall, then jump over to it.
 -
 Step 2: Pick up the other hex and bring it into the first room.
 -
 Step 3: Swap out a hex for a connector.
 -
 Step 4: Connect the blue receiver to open the blue door to the second room. Swap out another hex for the second connector.
 -
 Step 5: Connect the blue receiver inside the second room as well. This frees up the connector in the first room.
 -
 Step 6: Swap out the connector from the first room for the teleporter. Place the teleporter near the grill wall between the first and second rooms.
 -
 Step 7: Disconnect the receiver, and place the connector on the pressure plate, which opens the door to the third room. Teleport out into the first room.
 -
 Step 8: Walk into the fourth room, pick up the jammer, and teleport through the window to the first room, bringing the jammer with you.
 -
 Step 9: Jam the blue door outside from the corner, then take the ladder to finish the puzzle.


