Hidden: Difference between revisions
Tearphones (talk | contribs) puzzle elements, summary and hints |
RichouHunter (talk | contribs) →Solution: Added solution |
||
| Line 25: | Line 25: | ||
== Solution == | == Solution == | ||
{{Spoiler| | |||
<gallery mode="slideshow"> | |||
File:East 3 - 6 - 1.jpg|Take the [[connector]], link it to the blue [[emitter]], and place it far back in the open area. | |||
File:East 3 - 6 - 2.jpg|Take the [[inverter]], walk around the corridor, and link the [[emitter]], the [[connector]] and the red [[receiver]] in the middle. | |||
File:East 3 - 6 - 3.jpg|Take the connector, use it to link the emitter to the blue receiver by the open door and place it down far back in the open area. | |||
File:East 3 - 6 - 4.jpg|Take the inverter, walk back to the other side of the corridor, and link the connector through the purple barrier, the emitter and the red receiver by the door. | |||
File:East 3 - 6 - 5.jpg|Take the connector, bring it through the open door and place it down on the [[pressure plate]]. | |||
File:East 3 - 6 - 6.jpg|Take the inverter and place it down on the pressure plate. | |||
</gallery> | |||
|solution}} | |||
[[Category:TTP2 Main Puzzles]] | [[Category:TTP2 Main Puzzles]] | ||
[[Category:TTP2 Puzzles]] | [[Category:TTP2 Puzzles]] | ||
[[Category:Puzzles]] | [[Category:Puzzles]] | ||
[[Category:TTP2]] | [[Category:TTP2]] | ||
Latest revision as of 12:52, 7 March 2024
| Hidden | |
|---|---|

| |
| Identifier: | East 3-6 |
| Area: | Eastern Wetlands |
| Puzzle Type: | Main |
| Previous Puzzle: | Imprisoned |
| Next Puzzle: | Backward Propagation |
Hidden is the sixth main puzzle in the Eastern Wetlands area of The Talos Principle 2.
Puzzle elements
Overview
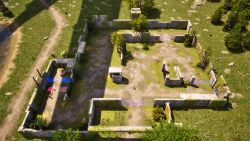
When you enter the puzzle, you find yourself in a large room with a blue emitter on one side, a connector in front of you, a blue door in the middle of the room controlled by a blue receiver, a red receiver in a small alcove, a blue door to the left, and two purple barriers. The left blue door and the two purple barriers all lead to an L-shaped outer room, which has an inverter, a red receiver, and two pressure plates that control access to the progress wheel.
Hints
A basic hint:
If you're struggling to get started:
If you're wondering about the rules of how inverters work:
If you're looking for an intermediate goal to make some progress:
If you're wondering what the eventual goal of the puzzle is:
If you're looking for an obvious hint about the core mechanic of this puzzle:


