Crossing: Difference between revisions
m Text replacement - "|image = File:North " to "|image = North " |
Tearphones (talk | contribs) puzzle elements, summary and hints |
||
| (One intermediate revision by one other user not shown) | |||
| Line 1: | Line 1: | ||
{{Infobox TTP2 Puzzle | {{Infobox TTP2 Puzzle | ||
|identifier = North 2-3 | |identifier = North 2-3 | ||
| Line 10: | Line 9: | ||
'''Crossing''' is the third main puzzle in the Flooded Valley area of The Talos Principle 2. | '''Crossing''' is the third main puzzle in the Flooded Valley area of The Talos Principle 2. | ||
== Puzzle | == Puzzle elements == | ||
{{Puzzle Element List}} | {{Puzzle Element List|Accumulator=true|Blue door=true|Fan=true|Hexahedron=true|Jammer=true|Pressure plate=true}} | ||
==Overview== | ==Overview== | ||
When you enter the puzzle, you find a [[jammer]] and an [[accumulator]] near you. There is an angled [[fan]] pointed at a room on the side, and another angled fan inside that room pointed back out. Both fans are active. Inside that room is a [[hexahedron]]. On the left, behind some standard height grates, is a blue [[emitter]]. On the right, behind a grill wall connected to a red [[receiver]], is the [[progress wheel]]. | |||
Ahead of you is a [[blue door]] that leads to the rear area of the puzzle. In that area, there is a [[pressure plate]] that gates access to an L-shaped room on the left, which has a blue receiver. On the right is a blue door that leads to a room with a red emitter in it. | |||
== Hints == | |||
{{ProgressiveHint|A basic hint|Since the name of the puzzle is ''Crossing'', you have to pay particular attention to how you are crossing from one room to another.}} | |||
{{ProgressiveHint|If you're struggling to get started|Bring the hexahedron out to the main area. Play around with the jammer - it can jam a variety of things.}} | |||
{{ProgressiveHint|If you got some equipment, but can't figure out how to charge the accumulator|This puzzle introduces a bit of a new mechanic that you haven't seen before. Notice how an accumulator behaves when charging: it connects to the source for a short time, then disconnects. Perhaps some activity in the outer room will give it enough time to get charged?}} | |||
{{ProgressiveHint|If you charged your accumulator, but are wondering what to do next|The second stage of the puzzle requires you to move the jammer to the rear area of the puzzle.}} | |||
{{ProgressiveHint|If you're having trouble changing the color of your accumulator|Remember that pressing and holding the alternate button for the accumulator discharges it, and allows you to charge it up again. Use the jammer inside the rear area to open whatever doors are needed.}} | |||
== Solution == | == Solution == | ||
Latest revision as of 07:34, 16 December 2023
| Crossing | |
|---|---|

| |
| Identifier: | North 2-3 |
| Area: | Flooded Valley |
| Puzzle Type: | Main |
| Previous Puzzle: | Triptych |
| Next Puzzle: | Wellspring |
Crossing is the third main puzzle in the Flooded Valley area of The Talos Principle 2.
Puzzle elements
Overview
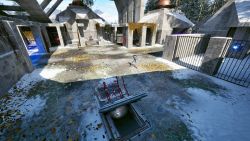
When you enter the puzzle, you find a jammer and an accumulator near you. There is an angled fan pointed at a room on the side, and another angled fan inside that room pointed back out. Both fans are active. Inside that room is a hexahedron. On the left, behind some standard height grates, is a blue emitter. On the right, behind a grill wall connected to a red receiver, is the progress wheel.
Ahead of you is a blue door that leads to the rear area of the puzzle. In that area, there is a pressure plate that gates access to an L-shaped room on the left, which has a blue receiver. On the right is a blue door that leads to a room with a red emitter in it.
Hints
A basic hint:
If you're struggling to get started:
If you got some equipment, but can't figure out how to charge the accumulator:
If you charged your accumulator, but are wondering what to do next:
If you're having trouble changing the color of your accumulator:
