Breach: Difference between revisions
Tearphones (talk | contribs) elements |
m Change Mover to Rail drone |
||
| (3 intermediate revisions by 2 users not shown) | |||
| Line 7: | Line 7: | ||
|next = [[Transference]] | |next = [[Transference]] | ||
}} | }} | ||
'''Breach''' is the seventh main puzzle in the Western Delta area of The Talos Principle 2. | '''Breach''' is the seventh main puzzle in the [[Western Delta]] area of The Talos Principle 2. | ||
== Puzzle | == Puzzle elements == | ||
{{Puzzle Element List|Accumulator=true|Blue door=true|Connector=true| | {{Puzzle Element List|Accumulator=true|Blue door=true|Connector=true|Rail drone=true|Pressure plate=true|Receiver=true}} | ||
==Overview== | ==Overview== | ||
As you enter the puzzle, you see a large open area with a pillar in the middle. On top of the pillar is a fixed [[connector]] that is statically connected to a red [[receiver]] in the second room, a blue receiver in the main area, and a red [[emitter]] on the left side of the main area, although that is currently blocked off by a [[blue door]]. | As you enter the puzzle, you see a large open area with a pillar in the middle. On top of the pillar is a fixed [[connector]] that is statically connected to a red [[receiver]] in the second room, a blue receiver in the main area, and a red [[emitter]] on the left side of the main area, although that is currently blocked off by a [[blue door]]. On the right side, behind some grates, is a blue emitter. There is a connector readily available. | ||
In the second room, there is an [[accumulator]], a blue receiver, a red receiver, and a red [[ | In the second room, there is an [[accumulator]], a blue receiver, a red receiver, and a red [[rail drone]]. When both the blue and red receivers are activated, the blue door deactivates, and allows access to the third room. In the third room, the progress wheel is on a platform at a higher elevation. | ||
== Hints == | |||
{{ProgressiveHint|A basic hint|Since the name of the puzzle is ''Breach'', the central question of the puzzle is how will you move across one of the critical blue doors.}} | |||
{{ProgressiveHint|If you're having trouble getting started|You cannot aim at the blue receivers straight from the little alcove near the blue emitter. You should use the static connector instead}} | |||
{{ProgressiveHint|If you're having trouble keeping the outer door open while working in the inner room|You should figure out a way to keep the outer door opened permanently.}} | |||
{{ProgressiveHint|If you want a bit more obvious hint about the accumulator|The accumulator is only used once. You charge it, connect it to a couple things and set it down, then you never touch it again.}} | |||
== Solution == | == Solution == | ||
{{Spoiler| | |||
<gallery mode="slideshow"> | |||
File:W1-7-breach-solution-01.jpg|Step 1: Connect the blue emitter to the static connector in order to open the outer blue door. Grab the accumulator from inside. | |||
File:W1-7-breach-solution-02.jpg|Step 2: Charge the accumulator blue and connect it to both blue receivers. Keep it this way for the rest of the puzzle. | |||
File:W1-7-breach-solution-03.jpg|Step 3: Grab the connector from outside and connect it to the static connector and the rail drone. It is currently inactive. | |||
File:W1-7-breach-solution-04.jpg|Step 4: Go outside and step on the pressure plate to activate the rail drone. Wait till it reaches the end of the path, then step away. | |||
File:W1-7-breach-solution-05.jpg|Step 5: Grab the connector and put it on the pressure plate. This makes the static connector red. | |||
File:W1-7-breach-solution-06.jpg|Step 6: Notice that both the red and blue receivers are now active, opening the inner blue door. | |||
File:W1-7-breach-solution-07.jpg|Step 7: Step on the rail drone and then onto the platform with the progress wheel on it. | |||
</gallery> | |||
|solution}} | |||
[[Category:TTP2 Main Puzzles]] | [[Category:TTP2 Main Puzzles]] | ||
[[Category:TTP2 Puzzles]] | [[Category:TTP2 Puzzles]] | ||
[[Category:Puzzles]] | [[Category:Puzzles]] | ||
[[Category:TTP2]] | [[Category:TTP2]] | ||
Latest revision as of 18:46, 19 December 2023
| Breach | |
|---|---|

| |
| Identifier: | West 1-7 |
| Area: | Western Delta |
| Puzzle Type: | Main |
| Previous Puzzle: | Elements |
| Next Puzzle: | Transference |
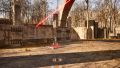
Breach is the seventh main puzzle in the Western Delta area of The Talos Principle 2.
Puzzle elements
Overview
As you enter the puzzle, you see a large open area with a pillar in the middle. On top of the pillar is a fixed connector that is statically connected to a red receiver in the second room, a blue receiver in the main area, and a red emitter on the left side of the main area, although that is currently blocked off by a blue door. On the right side, behind some grates, is a blue emitter. There is a connector readily available.
In the second room, there is an accumulator, a blue receiver, a red receiver, and a red rail drone. When both the blue and red receivers are activated, the blue door deactivates, and allows access to the third room. In the third room, the progress wheel is on a platform at a higher elevation.
Hints
A basic hint:
If you're having trouble getting started:
If you're having trouble keeping the outer door open while working in the inner room:
If you want a bit more obvious hint about the accumulator:
Solution
-
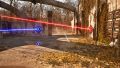
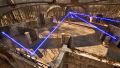 Step 1: Connect the blue emitter to the static connector in order to open the outer blue door. Grab the accumulator from inside.
 -
 Step 2: Charge the accumulator blue and connect it to both blue receivers. Keep it this way for the rest of the puzzle.
 -
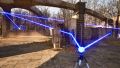
 Step 3: Grab the connector from outside and connect it to the static connector and the rail drone. It is currently inactive.
 -
 Step 4: Go outside and step on the pressure plate to activate the rail drone. Wait till it reaches the end of the path, then step away.
 -
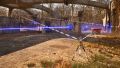
 Step 5: Grab the connector and put it on the pressure plate. This makes the static connector red.
 -
 Step 6: Notice that both the red and blue receivers are now active, opening the inner blue door.
 -
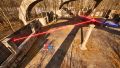
 Step 7: Step on the rail drone and then onto the platform with the progress wheel on it.


